This post gives you a deep understanding about system call and a way to add a new system call to Linux kernel.
System call is call to kernel service made using software interrupts. An interrupt is a way to notify kernel about occurrence of some event, and this results in changes in the sequence of instructions that is executed by the CPU. A software interrupt, also referred to as an exception, is an interrupt that originates by software in user mode. User mode is one of two distinct execution modes of operation for the CPU in Linux. It is a non-privileged mode in which each process starts out. So these processes dose not have privilege to access memory allocated by the kernel.
The kernel is a program that constitutes the core of an operating system, and it has complete control over all resources on the system and everything that occurs on it. When a user mode process wants to use a service provided by the kernel (i.e., access system resources other than the limited memory space that is allocated to the user program), it must switch temporarily into kernel mode, also called system mode, by means of a system call.
Kernel mode has all privileges, including root access permissions. This allows the operating system to perform restricted actions such as accessing hardware devices or the memory management unit. System calls can also be viewed as gateway to kernel through which programs request services from the kernel.

Flow Graph of System call
Above Figure shows the general flow graph of the system call. User application lies in user space and system call body is in kernel space. In the user application the kernel privilege data can accessed by the system call. System call body will start a new kernel thread to serve the user application.
I would like to take you through a sequence of steps in creating your own system call.
1. Editing kernel source code to add system call
2. Compiling modified kernel for x86 machine
3. Building an application to text your system call
Add System Call
Lets install all the dependency packages (libncurses5-dev)
sudo apt-get install libncurses5-dev
Then update and install all the upgrade your machine.
sudo apt-get update && sudo apt-get upgrade
Download kernel source code. Here, i am using the kernel 3.2, there are various other versions are available here. Below command also downloads kernel.
wget http://www.kernel.org/pub/linux/kernel/v3.0/linux-3.X.tar.bz2
Extract the tarball to ~/linux-3.x/
sudo tar -xvf linux-3.X.tar.bz2 -C ~/linux-3.x/
Change the directory to ~/linux-3.x/
cd ~/linux-3.x/
Now lets add the system call in the above downloaded kernel.
First, we need to create a new directory in the root of the kernel sources tree. Name of new directory is “new_syscall”. In this directory, we need to create two files.
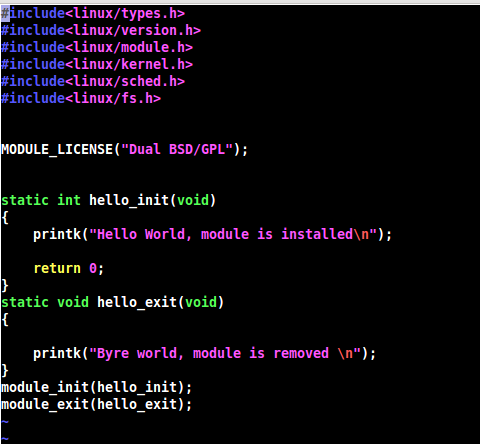
1. Implementation of our system call itself, hello.c:
The below snippet is the body of system call. Basically, This function is the one which should called in the kernel space when appropriate system call is invoked from the user space.

Implementation of system call
2. Makefile to build it
After creating the system call, we need to set up the Makefile to build it. Following snippet will show you the contain of Makefile which is used to build our system call.

Makefile for hello.c
This is a very simple Makefile, because the build system of the kernel takes care of most of the work. This concludes the new files that will need to be added to the kernel sources to make a new system call.
There are a few source files in the kernel that will need to be updated in order to add the new system call to be added to the kernel build system. The first, and simplest of these is the root-level Makefile. Find the following line, around line 711 of the root-level Makefile:
core-y := kernel/ mm/ fs/ ipc/ security/ crypto/ block
Add your newly created directory “new_syscall” as shown :
core-y := kernel/ mm/ fs/ ipc/ security/ crypto/ block/ new_syscall/
Now, open the include/linux/syscalls.h file, and add a definition for your new system call.
asmlinkage long sys_hello(void);
This step expose your system call to other parts of the kernel. While this is not necessary for this simple system call, it is still good practice for when adding a real system call to the kernel.
NOTE: asmlinkage keyword tells your compiler to look on the CPU stack for the function parameters, instead of registers. System calls are services that userspace can call to request the kernel to perform something for them. These functions can not behave like normal functions, where parameters are typically passed by writing to the program stack, but instead they are written to registers. While still in userspace, calling a syscall requires writing certain values to certain registers. The system call number will always be written in eax, while the the rest of the parameters will go into other registers.
At this stage, you simply need to add the name of your system call to arch/x86/include/asm/unistd_32.h. Register the system call symbolic name with the kernel by adding system call number and system call name as below.
#define __NR_setns 346
#define __NR_sys_hello 347 <Add this line >
#ifdef __KERNEL__
#define NR_syscalls 348 <add 1 in total number of system call>
#define
The kernel maintains a list of all registered system calls in the system call table. This table assigns each valid system call a unique system call number which cannot be changed or recycled(which is given in above step). Processes do not refer to system calls by name, but rather by their system call number.
The final file that needs to be updated is the system call table, which resides in arch/x86/kernel/syscall_table_32.S. Add the definition for your new system call, by adding the following:
.long sys_hello
After configuring the systemcall perfectly kernel compilation is done to use system call from user domain.
Compiling modified kernel
Linux kernel can be compiled natively in the Linux environment using the native “gcc” compiler. Make files allow configuration changes using particular make options. The steps involved in compiling the kernel are:
1. Call the make utility within the un-tarred Linux kernel code (in this case Linux-3.2) directory with the required option – menuconfig, defconfig, xconfig, oldconfig and so on. menuconfig is used to edit the text based version of linux. xconfig is used to edit the windows and other GUI tools in KDE system and gconfig is used to edit same but in gnome system. I have used “make oldconfig”, which can configure new kernel as my existing kernel configuration. Before this the directories can be cleaned using the “make mrproper” and “make clean” command.
2. Once the compilation configuration is done use the “make” command to compile the kernel. To compile project, first need to compile each source file into an object file, this in turn needs to be linked with system libraries into the final executable file. This all is done by build system of Linux kernel.
3. Once the kernel compiles successfully use the make modules and then the make modules_install options to compile and install modules into the kernel. Loadable modules are compiled and installed in the /lib/modules directory
4. Then use the “make install” command to install the kernel in the /boot partition.
5. Then switch to the /boot partition and use the “mkinitramfs” command with the –o option to create the RAM disk file as shown mkinitramfs –o initrd.img-<kernel_version_number>. You can get kernel version number by simple typing “uname -a” command on your terminal.
6. GRUB (GRand Unified Bootloader) is a boot loader package developed to support multiple operating systems/kernel and allow the user to select among them during boot-up. After installing the modules and kernel it is essential to update the grub file to see the installed kernel version in the boot option. So, use “update-grub” command to update the boot entries in the grub file.
Thats it. You have installed new kernel in your system. Now just reboot your system and and select newly compiled kernel from grub selection menu.
Building an application
That’s it ! you have successfully added new system call to the kernel. For simple testing of the system application program is essential which can call system call. Below application is test application for your system call. This application will invoke __NR_sys_hello from the kernel space using syscall().

Test application for developed system
Compile the program, run it and check the dmesg command to see the “Hello World ! I am your system call.” output. Use below commands to check the output of your system call.
$ gcc hello.c -o hello
$ ./hello
$ Return Value from syscall is : 0
$ Please check system console(using "dmesg") for system call output.

$ dmesg
Cheers… you have done it !