Tag Archives: Linux device driver

Device driver to interface shift reg with Raspberry pi 2

Hello Folks, after a long time my schedule allowed me to write some thing.

Today i am going to explain you the way to interface the shift register  with Linux based raspberry pi 2 board.  The shift register is the sequential logic which can used for data storage/parallel to serial conversation/ parallel to serial conversation. Hardware based stack can be constructed using several shift resister.

Shift registers are broadly distinguished in two types.

  1. Serial in, parallel out (SIPO):  In this configuration data is serially inserted in to shift register and output will be in form of parallel data bits. This is register used when more output ports are needed then available. This allows several binary devices to be controlled using only three pins, the binary controlled devices are attached to the parallel outputs of the shift register, then the desired state of all those devices can be sent out of the microprocessor using a single serial connection.
  2. Parallel in, serial out(PISO):  In this configuration parallely inserted data to shift register and output will be serial stream of bits. This configuration used to add binary inputs and give it in single stream to process. In this less micro-controller  pins are required to read the data.

This tutorials demonstrate how to interface SIPO  shift register (sn74hc595) to the raspberry pi 2. In addition to this, it explains how to write Linux device driver to control this hardware.

The sn74hc595 has an 8 bit storage register and an 8 bit shift register. Data is written to the shift register serially, then latched onto the storage register. The storage register then controls 8 output lines. Lets examine the ping configuration of sn74hc595 first. That will give us understanding about “How to drive sn74hc595 ? “.

Top_view

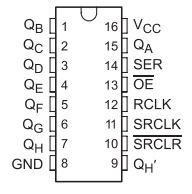
Ping configuration of sn74hc595

sn74hc595 register has 18 pins. which is shown in the image at left. Pin 16 is for VCC, which should be connected to 5v. Pin 8 is connected to common ground in the system. Pin number 1 to 7 and 15 is parallel data output pins.  Pin 14 is the serial data input pin.  Pin 11 is serial clock pin. when pin 11(SRCLK) goes from Low to High the value of pin 14(SER) is stored into the shift register and the existing values of the register are shifted to make room for the new bit. Pin 12 (RCLK) is used for latch. This pin should be low when data is written in the sift register. When it goes High the values of the shift register are latched to the storage register which are then outputted to pins Q0-Q7.  Pin 13 is to enable output. All latch output is enable if this pin is set to low.  Pin 10 is use for clear the output state on pins. Output pins will be cleared if low to high pulse is given to this pin. Default value of pin 10 is high.

How to co

So to drive this register, we need to control 5 pins.  Pin # 14,13,12,11 and 10. We need to connect output pins to LEDs  to check output of shift register. Based on this, we have derived a circuit diagram.

First-schamatic

Circuit diagram

Above image shows circuit diagram. Here we are using GPIOs of raspberry pi to control shift registers. RPI GPIO 9 is used as serial data line when is connected to SER(pin 14) of sn74hc595 . RPI GPIO 11 is used as latch clock line which is connected to RCLK (pin 12) of sn74hc595. RPI GPIO 25 is used as serial clock line which is connected to SRCLK (pin 11) of sn74hc595.  RPI GPIO 8 is used as serial clear line which is connected to SRCLR(pin 10) of sn74hc595. In addition to this, it is essential to connect VCC ad 5v and Common Ground with RPI.

Now, its time to design driver to control these GPIO pins. Driver will expose sysfs interface to change value represented by leds. Value which is written to this sysfs file will be represented by leds which is connected with sn74hc595.

So, lets start understanding responsibilities of init function of driver. As part of initialization of this driver, we need to Configure pin 21, 22,23 and 24 as GPIO which corresponds to GPIO 8, 9, 25 and 11.  In addition to this, we have to resigter sysfs class and device to control shift register.

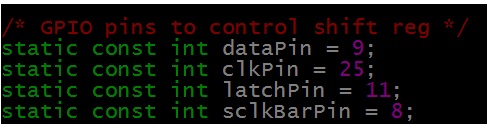
Les take a deep dive  into source code of driver.  As first part we have declared to global GPIOs pins which can be used in all driver code. As per our circuit design above we have declared the pins which is shown in below code snippet.

declatation of GPIO

GPIO Declaration

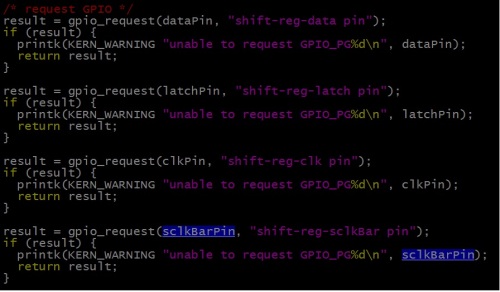
As part of initialization we have to configured this pins as GPIO pins. Below code snippet configures and request this pings as GPIO. The below snippet is part of init function of driver.

requrst_GPIO

Configure Pings as GPIO

Now we have to configure this pins as output pins and set to appropriate default value.  As explained above we need to configure Pin 10(serial clock bar) to high.  The default value of all other pins will be low. The below snippet shows this.

op

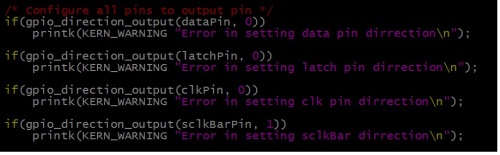
Configure GPIOs as output

Lets register sysfs interface to control output of shift register.  I have created new sysfs class and device to represent shift resister.

sysfs

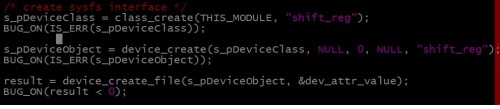
Registration of Sysfs interface

Every device interface in sysfs has attributes which can be read or write. Corresponding read write function registered with the attribute will get called when read or write operation performed on the this interface. Below snippet shows the registration of attribute named value with set and get value callback.

The attribute name should be the same as given by the time of creating file. Here we have given name as dev_attr_value. So out attribute is the value for which we have registered set and get routine. when we tried to read the file(sysfs Interface) from application, get_value_callback will be triggeres in the driver. In case we tried to write some value to file(sysfs Interface) from application,  set_value_callback will be triggers with the value to write in shift register.

attribute

Registration of sysfs device attribute

On low to high transmission of clock pulse,  internal register(storage register) value will shift by one and value on data pin will be moved to LSB of internal register. At the end after 8 bit data is shifted to the shift register,  by providing the latch pulse from low to high, all data from the internal register(storage Register) is latched to shift register pins. We have connected LEDs to the output pins of shift register.  This is shown by below snippet. To write some value to shift register,  it is essentials to put that value on data pin of shift register and then provide a clock pulse. On this clock pulse, data on internal register gets shifted and adds new bit(which is present on data pin) at the end presently shifted data.  So here in code, I am setting bit by bit this new_value variable on data pin and after setting one bit providing clock pulse. At the end i am providing the latch pulse so the 8 bit value which stored in the internal storage register will be  latched to the pins.

set_attribute

Routine to set value

When user application tries to  read the value from the sysfs interface, the get_value_callback will get called.  The callback will return old_value which was updated by the get value callback. The below snippet shows that. get_attribute

Here you can get full code for this driver. you can follow this steps to add module to Linux kernel source code and compile it.

Cheers !!!

Leave a comment

Filed under Linux Device Driver, Uncategorized

Concept of Shared IRQs in linux

In this post, i am gonna talk about the shared IRQ and how Linux kernel handle shared IRQs.

As wikipedia states “In a computer, an interrupt request (or IRQ) is a hardware signal sent to the processor that temporarily stops a running program and allows a special program, an interrupt handler, to run instead”.

In any embedded system, When a device needs the CPU it sends a request to the CPU. When the CPU gets this request it stops everything what it is doing (and save in memory where the CPU left for the task it was doing) and then it serve the device that sent the request. After serving the device, it gets the work what it was doing from cache/HDD and carry on what it was doing before that interrupt was sent. This request is known as IRQ (interrupt request). So, interrupts are interruptions of a program caused by hardware, when it needs an attention from CPU.

There are limited Interrupts lines(pins) are available on every SoC. Idealistically, one IRQ line can only serve one device. It menace that number of device that can communicate with the processor is equal to the number of IRQ lines available on processor. Which is not enough as per the modern embedded device complexity. As a solution of this situation, modern hardware,  has been designed to allow the sharing of interrupt line among couple of device. Its a responsibility of a software developer to enable/disable appropriate hardware for interrupt on shared line and maintain the list of IRQs for shared line. On the arrival of interrupt on shared line, appropriate ISR from list should gets called to server the device.

Here as a part of this post we will going to explore how shared IRQ can registered and used with Linux kernel.

request _irq() is the function, which is used to request and register normal IRQ with Linux kernel. The same function is used to registered shared IRQ. The difference is SA_SHIRQ bit must be specified in the flags argument when requesting shared interrupt. On the registration of shared IRQ kernel checks for any other  handler exists for that interrupt and  all of those previously registered also requested interrupt sharing. If it found any other handler for same IRQ number, it then checks dev_id parameter is unique, so that the kernel can differentiate the multiple handlers. So it is very essential that dev_id argument must be unique. The kernel keeps a list of shared handlers associated with the interrupt, and dev_id is used as the signature that differentiates between all handlers. If two drivers were to register same dev_id  as their signature on the same interrupt, things might get mixed up at interrupt occurrence , causing the kernel to oops when an interrupt arrived. When a hardware device raises the interrupts on IRQ line, the kernel invokes every handler registered for that interrupt, passing dev_id, which was used to register the handler via request_irq().

When interrupts occurs on shared IRQ line, kernel invokes each and every interrupt handler registered with it by passing each its own dev_id. Shared IRQ handler should quickly check the dev_id with its own to recognize its interrupts and it should quickly return with return value of IRQ_NONE if own device has not interrupted(dev_id does not match). If dev_id matches ISR should return IRQ_HANDLE so kernel stops calling nest interrupt handler. In addition to this, driver using shared IRQs should not enable or diable IRQ. If it does, things might go wrong for other devices sharing the line; disabling another device’s interrupts for even a short time may create latencies that are problematic for that device.

Be very cautious while playing with shared interrupts !!

cheers 🙂

6 Comments

Filed under interrupts in linux, Shared IRQ

The story of device tree for platfrom device….

The whole story starts from non discover-able devices in the system. This post will provide you information about non discoverable devices as well it will provide you one of way of Linux kernel to deal with it. The second and fresh way is device tree.

Kernel starts, it has to initialize the drivers for the devices on the board. But often on embedded systems, devices can’t be discover at running time(i2c, spi, etc.). In this case, the Linux kernel has a c (board file) file that initialize these devices for the board. The below image shows structure for non discoverable devices and platform data for same. This will be registered with the virtual bus named platform bus and driver will also register it self with platform bus with the same name.

In this method,  kernel must be modified/compiled for each board or change in hardware on board.  Kernels are typically built around a single board file and cannot boot on any other type of system. Solution of this situation is provided by “Device tree”. A device tree is a tree data structure with nodes that describe the physical devices on the board. While using device tree, kernel no longer contains the description of the hardware, it is located in a separate binary blob called the device tree blob. The device tree is passed to the kernel at boot time. Kernel reads through it to learn about what kind of system it is. So on the change of board only developer needs to change device tree blob and that it new port of kernel is ready.

Platfrom device

Platform device

Here, you will get a good article on device tree format. It is recommended to go through it first at this stage.

Platform devices can work with dtb enabled system with out any extra modification. If the device tree includes a platform device that device will be instantiated and matched against a driver. All resource data will be available to the driver probe() in a usual way. The driver dose now know wither this device is not initialized with hard-cored. in board file.

Every device in the system is represented by a device tree node. The next step is to populate the tree with a node for each of the devices. The snippet below shows the dtb with node name “ps7-xadc”.  Every node in the tree represents a device, which must have a compatible property. compatible is the key using which an operating system uses to decide which device driver to bind to a device. In short compatible(ps7-xadc-1.00-a) specifies the name of the platform device which will get registered with bus.

Platform device in DTB

Platform device in DTB

On other side, in device driver when platform deriver structure is declared, it stores a pointer to “of_device_id”. This is shown by the below snippet. This name should be same which was given in the dtb file.  Now, when driver with name of “ps7-xadc-1.00.a” will get register with the platform bus, probe of that driver will get called.

Platform driver registration

Platform driver registration

The below snippet shows the probe function of the driver. In the probe, function platform_get_resource() provides property described by “reg” in dtb file. In our case base address of register set(0xf8007100) for hardware module and offset from the base address(0x20)  can be retrieved. Using which driver can request the memory region form the kernel. As same, function platform_get_irq() provides the property which id describe by “interrupts” in dtb file.

Getting device specific data

Getting device specific data

After garbing all details from dtb file, probe will register device as a normal way.  This is very straight forward procedure using which platform drivers work with device trees. As a result of this,  no need to declare platform_device in board file.

Cheers !!!

4 Comments

Filed under Device tree, Linux Device Driver, Platfrom device, Uncategorized

Concept of ISR in Linux

In this article, i am going to discuss about Interrupt handling mechanism of Linux kernel.

So the story starts from When an interrupts occurs, the processor looks if interrupts are masked. If they are, nothing happens until they are unmasked. When interrupts become unmasked, if there are any pending interrupts, the processor picks one. Then the processor executes the interrupt by branching to a particular address in memory. The code at that address is called the interrupt handler. When the processor branches there, it masks interrupts (so the interrupt handler has exclusive control) and saves the contents of some registers in stack. When the handler finishes executing, it executes a special return-from-interrupt instruction that restores the saved registers and unmasks interrupts.

The problem over here is :

The Corresponding interrupt is disabled during the execution of a interrupt handler, the interrupt handler expected to be finish fast But, what if you have to do a lot of data processing, memory allocation in a interrupt handler.

After kernel release of 2.6 this problem is resolved by designing and developing proper interrupt handling mechanism. Which splits he interrupt handling in to two parts. 

  1. Top-Half: The top half is the real interrupt handler: It just tells the kernel to run the bottom half, and exits. The kernel guarantees that the top half is never re-entered: if another interrupt arrives, it is queued until the top half is finished. Because the top half disables interrupts, it has to be very fast.
  2. Bottom-Half: The bottom half is run after the interrupts are processed(Top half is executed).The interrupts are not disabled while the bottom half is run, so it can do slower actions.

NOTE: Its totally device driver developers choice to split interrupt processing or not. If the ISR is going to very short and can be managed then there is no need of  bottom-half. Similarly, if the disabled interrupt for a long time is OK for use case, then healthy top half is also possible. So, it is a totally design decision.

Linux provides three mechanism to implement bottom half.

1. softIrq : 

It is a vector of 10 different entries (in kernel 3.16) supporting variety of bottom half processing also called software interrupt. All entries are shown by the image below.

Linux/include/linux/interrupt.h

Linux/include/linux/interrupt.h

  • Softirqs are statically allocated at compile-time. So there are fixed number of softirq and they run in priority order.
  • Softirqs have strong CPU affinity, so they are reserved for most of time critical and important bottom half processing on the system.
  • softirq is guaranteed to run on the CPU it was scheduled on in SMP systems.
  • It Runs in interrupt context, so Interrupt context cannot perform certain actions that can result in the kernel putting the current context to sleep, such as downing a semaphore, copying to or from user-space memory or non-atomically allocating memory
  • it can’t preempted and can’t scheduled
  • Atomic execution
  • it can run simultaneously on one or more processor, even two of the same type of softirq can run concurrently

Softirqs are most often raised from within interrupt handlers. First the interrupt handler(top half) performs the basic hardware-related work, raises the softirq, and then exits. After the kernel is done processing interrupts, it checks wither any of the softirqs have been raised or not. Code flow in Linux kernel for interrupt handling is explained below.

Interrupt

 | do_IRQ()  (top half which masks all interrupts and invoke softirq)

   | irq_exit() (Release all masked interrupts)

     | invoke_softirq() (Kernel checks for the any pending invoked irq)

       | do_softirq() (Execution of softirq (bottom half) with )

2. Tasklet

Tasklets are build on top of softirq. The central idea of tasklet is to provide rich bottom half mechanisum. Only below points diffres from softirq.

  • Tasklets have a weaker CPU affinity than softirqs
  • Unlike softirqs, tasklets are dynamically allocated.
  • A tasklet can run on only one CPU at a time.
  • Runs in interrupt contex, Interrupt context cannot perform certain actions that can result in the kernel putting the current context to sleep, such as downing a semaphore, copying to or from user-space memory or non-atomically allocating memory
  • Atomic execution
  • Two different tasklets can run concurrently on different processors, but two of the same type of tasklet cannot run simultaneously on same processor.
  • Tasklet is strictly serialized wrt itself, but not wrt another tasklets.
  • Tasklet runs on same CPU from where is raised

Why softIRQ if tasklet is there ?

I’ll explain the need of softirq. That’s the networking code. Say you get a network packet. But to process that packet, it takes a lot of work. If you do that in the interrupt handler, no other interrupts can happen on that IRQ line. That would cause a large latency to incoming interrupts and perhaps you’ll overflow the buffers and drop packets. So the interrupt handler only moves the data off to a network receive queue, and returns. But this packet still needs to be processed right away. Before anything else. So it goes off to a softirq for processing.But Now you still allow for interrupts to come in. Perhaps the network interrupt comes in again on another CPU. The other CPU can start processing that packet with a softirq on that CPU, even before the first packet was done processing. the same tasklet can’t run on two different CPUs, so it doesn’t have this advantage. In fact if a tasklet is scheduled to run on another CPU but is waiting for other tasklets to finish, and you try to schedule the tasklet on a CPU that’s not currently processing tasklets, it will notice that the tasklet is already scheduled to run and not do anything. So tasklets are not so reliable when it comes to latencies.

3. Workqueue

Workqueues are also like tasklets. They are useful to schedule a task that for future. There is some identical difference between  two,

Runs in kenrel process context. Because work queues run in process context (kernel threads), they are capable of sleeping

  • Non atomic execution.
  • Workqueue runs on same CPU from where is raised
  • Higher latency compared to tasklet.

NOTE: This article contains only conceptual details of Interrupt handling mechanism of Linux. 

8 Comments

Filed under interrupts in linux

Make Own LED blinking Driver for Raspberry pi ….

In this post, i am going to explain step by step procedure to make simple driver which can blink led on Linux powered raspberry pi. Raspberry pi is a credit-card sized computer developed by Raspberry pi Foundation ,UK. The Raspberry pi is equipped by Brodcom BCM2835 SoC, which includes an ARM1176JZF-S core clocked with 700 MHz. Raspberry pi was originally shipped with 256 MB of RAM, later upgraded to 512 MB of RAM. This card sized computer uses the SD card for booting and data storing purpose.

This tutorial demonstrates how to develop and debug a basic hardware driver for Raspberry PI. It will demonstrate the following techniques:

  • Controlling the BCM2708/BCM2835 peripherals by accessing their hardware registers
  • Handling of interrupts in Device driver
  • Creating a sysfs device object to provide user-mode control interface

Here, for my setup i am using raspberry pi model-A. I have compiled kernel(with my led blinking driver) for raspberry pi.

Compilation of Linux kernel for Raspberry pi

1. Get the kernel Source  code for here.

2. Get the tools(cross-compiler) from here.

3. Extract both files in your home directory. Here, i have extracted in /home/bhargav/rpi/.

3. Set the environment variable CCPREFIX:
export CCPREFIX= /home/bhargav/rpi/tools-master/arm-bcm2708/arm-bcm2708-linux-gnueabi/bin/arm-bcm2708-linux-gnueabi-

4. Set the environment variable KERNEL_SRC:
export KERNEL_SRC=/home/bhargav/rpi/linux-rpi-3.2.27

5. In KERNEL_SRC: execute “make mrproper” to ensure you have a clean kernel source tree

6. In KERNEL_SRC: execute below command  to configure  kernel source tree for raspberry pi

make ARCH=arm CROSS_COMPILE=${CCPREFIX} bcmrpi_defconfig

7. In KERNEL_SRC: execute below compile  kernel source tree for raspberry pi

make ARCH=arm CROSS_COMPILE=${CCPREFIX}

This process will give you kernel Image file at < KERNEL_SRC>/arch/arm/boot/  which can be places as kernel.img in boot partition of MMC.

Adding LED blinking device in board file

To add led blinking driver support in your build, you have to register your device in the board file of your board.

Board file for raspberry pi is located at <KERNEL_SRC>/arch/arm/mach-bcm2708/bcm2708.c which includes the subroutines for registering of all devices.

First, you need to add your header file of driver in to <KERNEL_SRC>/include/linux/ directory.

Here i am adding blinkled.h in the same directory. The below image will provide you more details about contain of file.

Header file for led blink driver

Header file for led blink driver

Include this header file in board file for raspberry pi. Add the below code in board file.

Defining a device in board file

Defining a device in board file

Here, i am declaring device named “LED_Blink” which has gpio number as a platform data on which it is connected.

Its time to register this declared device. In board file, bcm2708_init is a function which register all the peripherals devices with the kernel.

So, in this function we need to registered our device with the kernel platform bus.  Add the below line in in bcm2708_init function which register our device(“LED_Blink”) with kernel.

This device is added as platform device. I am not going in to much details of platform device, explanation can be found here.

Registration of Drivice

Registration of Device

At this stage we have registered our Led_Blink device to Linux kernel virtual bus. Now its time to write a driver for “Led_Blink” Device.

Writing driver for LED Blinking device

In the driver file, we need to declare one driver and register it with the kernel virtual bus with the same name which we gave to register device(“Led_Blink”). Linux kernel will compare the name of device and driver which is available on virtual bus and call the probe function of same driver. This is the basic concept of platform bus which is explained in the previous post.

Registration of Driver

Registration of Driver

Here, driver is declared with the  probe and remove function. Important thing is the name of the driver which is same as the device which we declared in device( In board file). Init function is the first function, which will be called on the successfully insertion of driver in the kernel. In our init function we have registered the platform driver to the bus.

On availability of the same device on the bus, kernel will calls the probe function of the same driver. So, after init function, probe will get called by the Kernel subsystem. Basically, probe will do all the initialization of device(GPIO) .

According to the BCM2835 peripheral  manual, the GPIO pins can be controlled by first configuring them as output by writing to one of GPFSELx registers and then writing to GPFSETx/GPFCLRx registers. We will define a structure describing the GPIO registers and provide functions for controlling GPIO pins using it.

Probe routine of LED blink driver

Probe routine of LED blink driver

Above snippet shows the body of probe function. In the probe function, there are three impotent things  are done.

1. Configure Pin as GPIO

The below snippet shoes the routines for set pin functionality and set output value of pin.  This functions uses the structure pointer to access the registers of SoC.

Gpio Routines

Gpio Routines

2. Setup time for On and Off timing of LED

When timer elapse, state of pin will get changed and again timer will be re initialized from timer subroutine. The snipped below shows the body of time handler.

This subroutine causes the blinking of the LED.

Timer handler subroutine

Timer handler subroutine

3. Register /sys interface  to change blink period from user domain

Sys interface is used to change the blinking period from user space. From the probe function BlinkLed_attr is registered for sys interface which has only one attribute name “period”.  User can get and set time interval using this interface. s_BlinkPeriod variable is used to store blanking period. The snippet below shows the subroutines for same.

Sys interface routines

Sys interface routines

You can download full driver code from here.

You have to add this add this module to linux source code. Here are the steps to do that.

Now, its time to compile your tweaked kernel using the steps shows above. Repeat from steps #5.

Enjoy your driver  !!!

21 Comments

Filed under Linux Device Driver

Platform Device and Platform Driver @ Linux

I was trying to learn Linux device driver and  system programming. Two simple question i had was, how does the Linux kernel know, which devices are present  and what resources(bus channel, interrupts, power on switch, etc..) it is using ? what are the drivers for them ?

After going through Linux kernel source code and exploring couple of kernel documents I sum up that  “Platform Device, Platform Driver and Platform Data” is the solution of  my questions. In this post i am trying to highlight the concept of platform device and platform driver with the help of  pseudo code.

Unified driver model has introduced in the Linux kernel 2.6 release.
There are several kind of devices are connected to CPU using different type of bus interfaces.
eg : PCI, ISA, I2C, USB, SPI, etc…
According to working mechanism, these buses can be divided in to two categories.

1. Discover-able :
Now a days buses like PCI and USB, which have discover-ability built into them. When a device is connected to a bus, it receives a unique identification which will be used for further communication with the CPU. Which menace that, device sitting on a PCI/USB bus can tell the system what sort of device it is and where its resources are. So the kernel can, enumerate the available device and driver to initialized device using the probe method normally. This kind of bus mechanism usually found with x86 architecture(PC).

2 Non discover-able :
Embedded system usually don’t have a sophisticated bus mechanism found in PC systems. we have buses like I2c or SPI. Devices attached to these buses are not discoverable in the above sense as i tried to explain. The OS has to be explicitly told that, for example, a EEPROM is connected on the I2C bus at an address of 0×DA. In this case, platform device/driver comes in a picture.

So basically, Platform devices are inherently not discoverable, i.e. the hardware cannot say “Hey! I’m present!” to the software .

Unlike PCI or USB devices, I2C devices are not enumerated at the hardware level (at run time). Instead, the software must know (at compile time) which devices are connected on each I2C bus segment. So USB and PCI are not platform devices.

In the embedded and system-on-chip world, non – discoverable devices are increasing rapidly. So basically all non discoverable devices are connected to the virtual bus and declares its name. This virtual bus is known as “platform bus”. On the other side, driver requests a device with the same name on the bus.

The whole story starts from board file. A board file is heart of each Linux kernel, which specifies all the information about what and how peripherals are connected to processor. eg: devices present on buses such as SPI and I2c. In the board file you can find all the devices are registered with the name and appropriate data. This data is known as the platform data. This Platform data will pass to driver. Generally Platform data is the device specific data. Eg: Bus id, interrupts ,etc ..

Here i have created pseudo device and driver to develop clear understanding of all these. In your board header file declare a private data structure according to resources used by your device. Here, i am declaring test_platfrom_data. The snippet 1 below will provide more information about members of test_platform_data.

Snippet 1

Snippet 1

In my board c file i have created instance of this structure  with appropriate data. This  user defined structure will passed to the driver w. Snippet 2 will provide you details about private data which is assigned to structure instance.

Snippet 2

Snippet 2

Now its time to define platform device in board file. In Linux kernel struct platform_device is declared. Lets create a instance of this structure. This will passed to kernel for registration of platform device. Snippet 3 will show you definition of platform device.

Snippet 3

Snippet 3

The main important point is the name of device.  Here in my case name of my device is “drivertest”.  From board init function add line(shown by snippet 4) to register this platform device.

After this edition in board file, compile kernel using appropriate cross compiler and boot your board with this kernel.

Snippet 4

Snippet 4

After success full booting of board, start making driver(.ko) file  for your registered device. Structure platfrom_driver is used to register platform driver. Here, snippet below shows the definition of platfrom_driver structure.  Register platform driver in init function using platfrom_driver_register.

Snippet 5

Snippet 5

Here, the impotent thing is the name of driver. Name of driver is as same as the name of device(in board file). On the registration of new platform driver, linux kernel compare its name with the previously defined all platform device name. If the match is found the probe function of the driver is called with  appropriate data which is responsible to initialize the device. The whole device structure is passed through probe function. The snippet below shows the subroutine for probe function.

Snippet 6

Snippet 6

In the probe function of driver,  i have extracted platform data from probe, which is assigned to the device at the booting time. This platform_data contains all the low level information about device. On the basis of this data, probe function initialize the device and irq using this data. Generally this data contains the information about module id, data rate, interrupt   etc..

I have compiled module and the output i is pasted below which shows the platform data is extracted from the probe.

Output

output sdfdfas

This is how the whole initialization of non dicoverable devices works.

24 Comments

Filed under Linux Device Driver, Platfrom device